Want to know the biggest mistake I see homeowners make when they are designing their gardens? It’s this: they always start with the plants.
I get it – the plants are fun, and the garden center is pretty, and wow! – It is so nice to imagine how these green leafy things will transform your drab yard into that gorgeous future landscape oasis you might imagine.
Yes, we have all been there. The problem is that the garden nursery visit is one of the last things you should be doing, and by starting there, you’ve increased the odds of landscape disappointment exponentially.
I’ve been a professional designer for over 20 years but I’m not immune to the siren song of a nursery… so to help keep you (and me!) on track, as we evolve the landscapes that we controls – I’m sharing my the 7-step garden design system for beginners or experienced gardners (aka my more professional garden design process).
Hopefully you can use this framework to help you take the right steps (in the right order – because the order is Key!) to design your own garden – the right way.
Let’s save ourselves from the despair of wretched plants, Pinterest backyard fails, and wasting way too much hard-earned cash on something that goes nowhere. Follow these seven steps for planning a garden design that actually works.
It is worth noting that I also share all this (and more) in video format – you can watch it here if you prefer to listen rather than read. You’ll need to register, and I’ll send you the link. (It is a previously recorded session of a live webinar)
Step #1 – Tools and Systems
The Tools of the Garden design Trade
No matter what it is you are doing – cooking, making pottery, or flying an airplane – You need tools. You need to know which knife to use, how to use a potting wheel, and or where the landing gear is.
The tools of garden design allow you to measure, draw, organize, develop, share, and recall your ideas so that you can build and manage what you imagine. Every garden designer you meet might have a few different tricks up their sleeves with their suite tools – these are a few of mine.
Garden and Property Measurement tools:
Before cell phones had handy measuring tools built right in, I used to take landscape measurements of gardens by hand with a big long measuring tape (it was 200 feet!).
I had the perfect skewer, fashioned from a kitchen implement, to hold the end so I could tromp around clients’ gardens without needing assistance.
If you don’t want to go digital, many designers use handy measuring wheels. They are great for a large garden and long distances. I’ve never invested in one though – when I started my career in London, England, no one had a garden big enough to really need a measuring wheel (lots of city and small town gardens for terraced houses with small backyards) – plus, I’d have never wanted to have to carry that on the tube!

Nowadays, I use digital tools (like the measurement app on my iPhone that uses the camera to measure) to get numbers on long distances. Google maps is also accurate enough to get the measurements I need for a property plan. If you have a plot plan of your property or a professional survey you can use that as well.
The bottom line is, you need to be able to draw (to scale) a flat plan (birdseye view) of your garden to start to begin working out how to break up the space into different functional areas. The things you need to locate on your scale plan include:
- property lines, fences, and boundaries
- the footprint of the house and the placement of the doors and windows
- outbuildings
- trees or other plants that are staying
- wells, septic systems, other buried hazards or services
- anything you want to keep in the new plan
The digital world has changed things a lot since I started making gardens professionally – from quick camera tools that ID plants and measure for you to Google Maps (where you can literally pull up your plot and measure nearly everything you need from the aerial view.). As a homeowner, it is getting easier and easier to DIY your garden’s design. I’ll keep updating this with new apps and tools I find that make designing easier and faster.
Set Yourself Up with Systems to Keep Track of Everything
My favorite digital tool that I use to design my garden (and TBH – I use it to organize my business and home reno projects and pretty much everything I do), but that I also share with all my garden and planting design students is Milanote.
Milanote is a designer’s Friend!
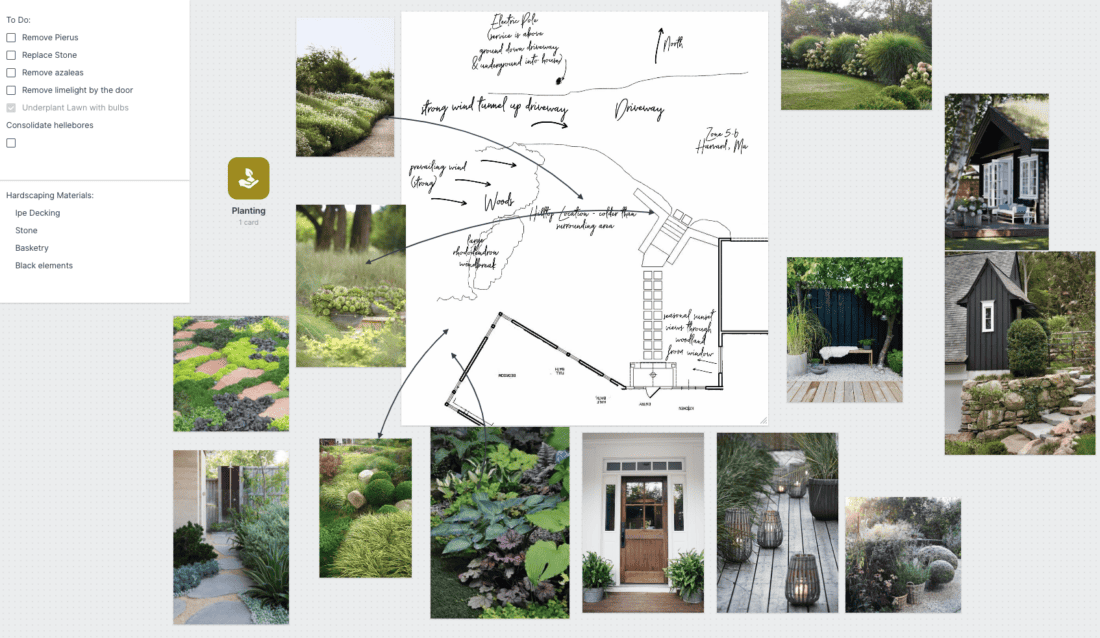
I’m a big fan of Milanote (you can get a free account at milanote.com) – it is a great, visually oriented place to bring together all the elements of your design. You can organize images, spreadsheets, lists, drawings, and more into pages that correlate to different areas of your project.
The great thing about setting yourself up with an organization system for designing and working on your garden project – is that once you have started to have a place for gathering and organizing your ideas – most people find that this becomes a great mechanism for allowing new (and better) ideas evolve.
Personally, I think it has to do with getting things out of your head and making space for something else to come in.
Get your own Milanote account:
If you want to upgrade to a PRO account (not necessary to get started), Milanote provides my garden design students with a 30% off coupon.
You are welcome to use the COUPON CODE too: rochelle30.
(I make no money off this -I’m just a huge Milanote fan)
Step #2 – Assess & Survey the Site and Establish the Usage Needs, Your Advantages and Challenges.
(Site = Your Backyard or Front Garden)
Taking a good inventory of a piece of land is imperative to your garden-making success.
There are three main components to a full professional site assessment :
- What are the Existing Conditions?
- What are Your needs, and how might they impact what is naturally going on in your landscape?
- What is the Site’s Context and History? (This can include things like an environmental assessment, risk assessment, zoning, property lines, needs, and usage survey)
I know this can start to sound like a lot. But even though you are working on the design of a home garden, it is still well worth taking the time to do a basic site assessment.
Most non-professionals don’t know where to start, but I can help you with my Homeowner’s Landscape Inventory and Guide to Site Assessment (see the download below).
The reality is that this is just a big data collection project.
I know this might make it sound boring and exactly the thing you might want to skip – but skipping this ALWAYS causes problems.
Don’t skip the site assessment – don’t skip the opportunity to understand what your land tells you – it will make garden-making much easier.

<<Download the Homeowners Landscape Inventory and Guide to Site Assessment Here>>
Your garden is way more than what you see between the property lines. Most people look out their windows and see a plot of dirt attached to their house with some property lines around the edges and think that’s it!
But it’s not it.
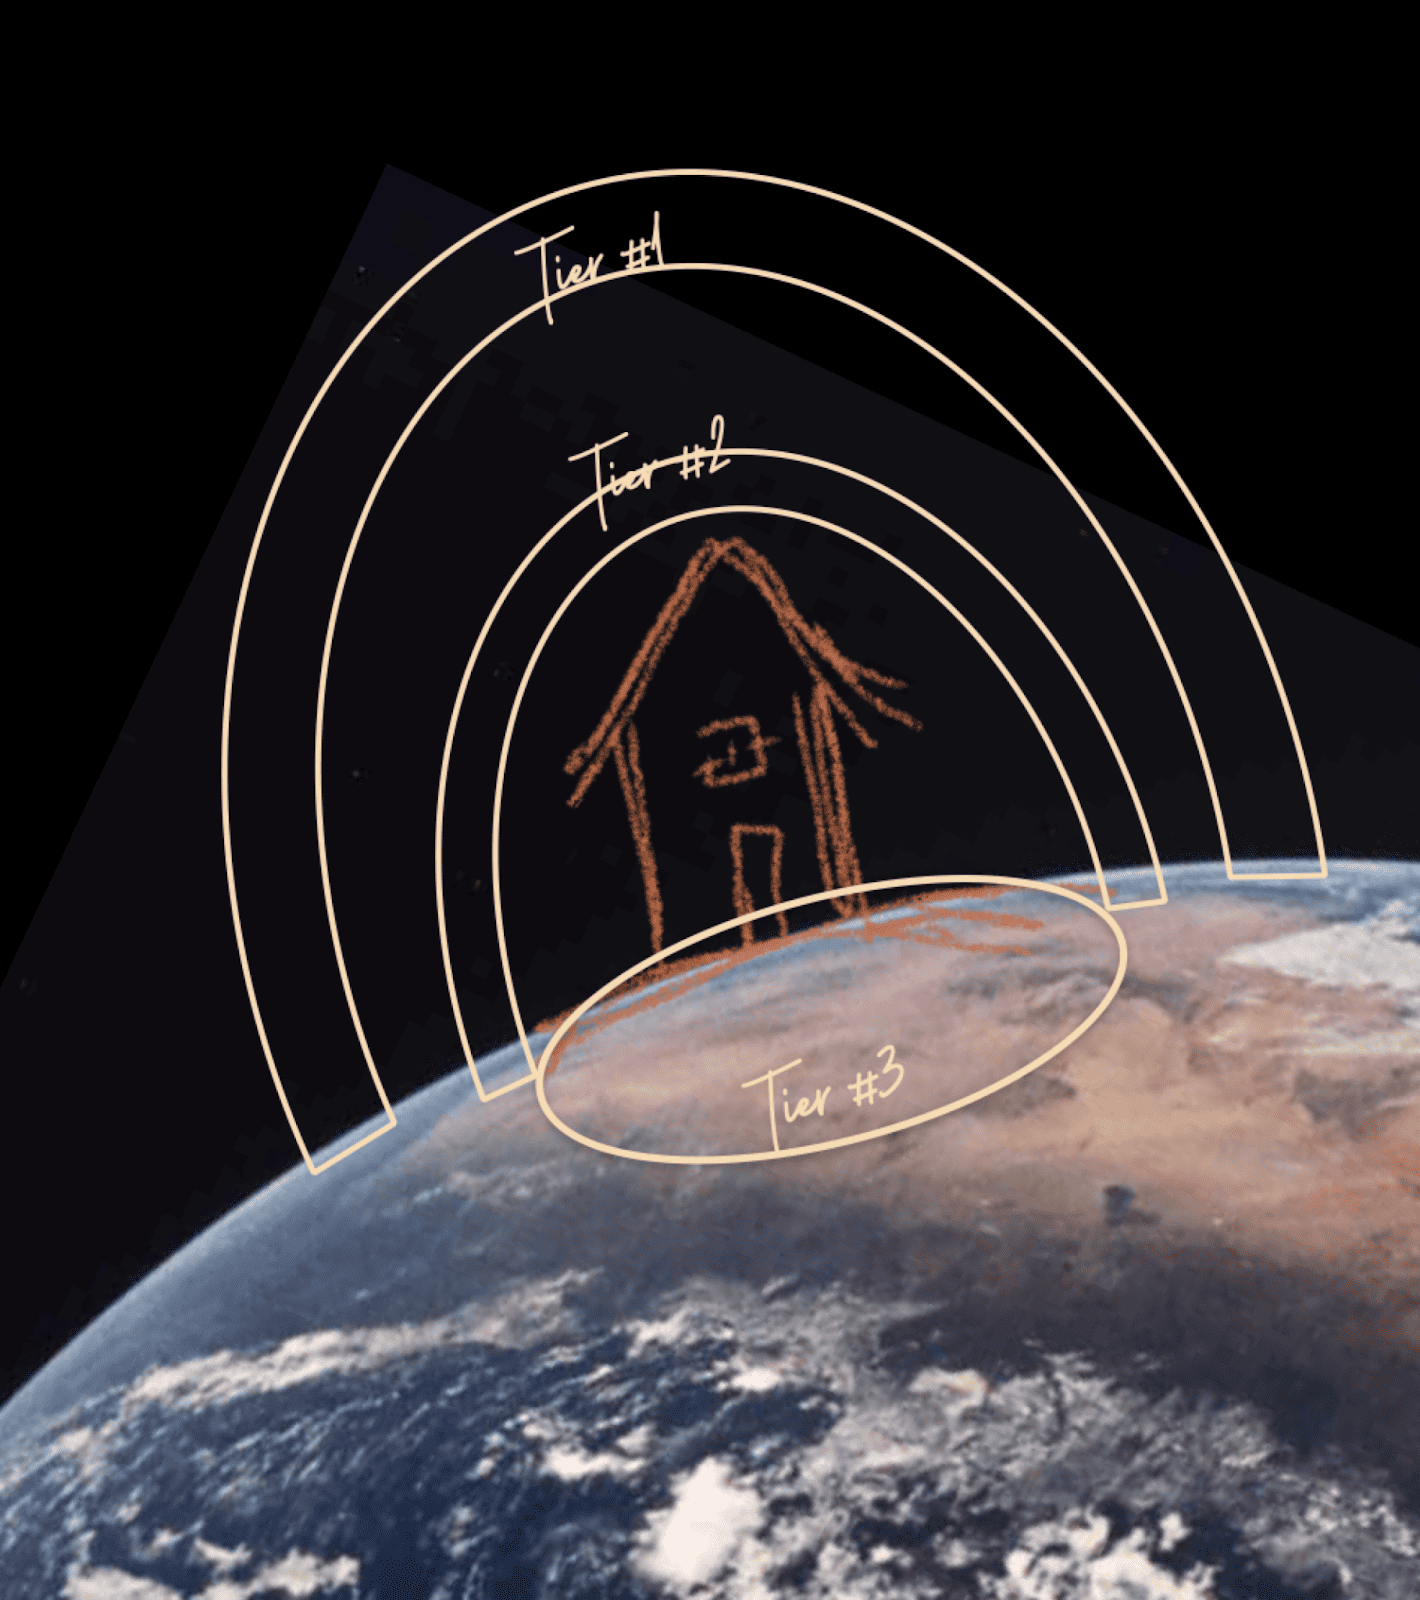
To systematically take note of the Existing Conditions and do a proper site landscape assessment – think in tiers – and take your time to really explore what is going on in each of these three areas!
Tier 1 – The overhead
Tier 1 is all things going on beyond your property lines; it is the climate, the local flora and fauna, the sun and seasons, and even migration patterns. It is potentially the mountains, the lake, or the ocean that you live near that might change the air quality, the light, and the humidity of your garden.
In a practical sense, it is overhead power lines and obstructions, but it is also the local vernacular and history – the Genius Loci. Let the landscape tell you its own story. Let the Genius Loci give you clues about how to plan a garden’s design.
These things are all influencing your landscape – and your landscape is part of all these things.
Tier 2 – The Garden Level
Tier 2 is generally all things we typically think of as our gardens. From property line to property line and everything we can see in between. This is the easiest tier to imagine and understand – but it does require you to pay attention and really understand how all the elements in the zone might be interacting with each other.
Tier 3 – The Underground
And then Tier 3 is everything underground – which is literally half your garden. This is a vast area that, even on a scientific level, has been historically under-examined – so it is no surprise that most gardeners don’t pay enough attention to it.
The underground is the key to making a successful garden. The underground is water, microorganisms, fungi and mycorrhizae, insects and animals, minerals, roots, rocks, and soil – the substrate that gives life to everything.
Take some time to examine and take notes about each tier. Grab a copy of the Homeowners Landscape Inventory and Guide to Site Assessment to guide you through the process.
It will help you explore your site and look for things you might not otherwise have noticed.
Establish Your Needs (so you can design a home garden that works for your life) :
In order to assess your needs, think about all the activities, people, and creatures that will use your landscape. For each person, examine what their unique desires might be and how they will access, use, and enjoy the home garden that you will design.
When I started my design practice over 20 years ago, I created an initial client questionnaire that I now share with my garden design students. (They can use it on themselves and maybe even for their future clients).
It is an exhaustive survey form that ensures they have fully explored what they need and how it needs to work for them and their families.
Make sure you do this for yourself. There is nothing more frustrating that creating a beautiful garden but then not having a place for the garbage bins. Or no one uses the hot tub because it is uncomfortable to walk to it with bare feet. Think about all the everyday uses – both utilitarian and functional and make it work for you.
There are a million reasons why your design could be absolutely perfect, or it could fall short – a lot of good home garden design is about thinking ahead and making the details work for you so your life is easier.
Site Context and History:
You will already have started to examine your site’s history and context as part of the site survey – but you need to make sure there aren’t other practicalities. Research ahead of time if there are HOA regulations you need to follow or other planning or zoning restrictions you need to abide by.
Surveying
Measure everything and make a scale drawing that can be used as a base plan for creating new and more exciting designs.
Why do we make scale drawings?
It is much easier to move things around with a pencil than with a shovel, but it also changes our perspective and allows us to see things in interesting new ways. Most importantly, if something works on paper – it will work on the ground.
If you are starting to feel like this is a lot – remember this –
“Everything that slows us down and forces patience, everything that sets us back into the slow circles of nature, is a help. Gardening is an instrument of grace.”
―May Sarton
Step #3 – Generate Ideas and Establish A Style & Story (Or stories) for your Garden Project
You Don’t Need More Garden Ideas. People gasp when I say that – but it’s true. The internet is full of ideas. Ideas come at us constantly, and we are overwhelmed by them. Most of the time, the ideas just fly by us, and we struggle to capture even the best ones.
Everyone is on an idea spectrum. At one end are the idea addicts and at the other are those who have no ideas at all. I call them the creatively cramped. You want to be in the middle.
The ideas addicts collect ideas -they have lots of them, and they love and want them all. (This is not only impossible, but a garden full of all the idea addict’s ideas would be an awful chaotic hair-brained place to be).
The creatively cramped ones have nothing – no ideas whatsoever. Or if they have one or two ideas, they are seriously questioning them and will probably never act on them.
Both these situations give away an unease with design.
Plan a garden – originality comes from editing and synthesizing ideas
Most people who feel like they don’t know how to design don’t understand the nature of creativity. True creativity is being able to find and EDIT ideas. And then SYNTHESIZE them into new and original concepts (not just a mosh pit of stuff thrown together).
The Editing and The synthesizing are processes of self discovery that are empowering and are driven by your creativity.
Remember, creativity takes practice. One person is not more creative than another – they may only just be more adept at using their inherent skill.
Determining a style for your garden is the beginning of an editing process. You can determine and define a style in a number of ways – Moodboards are great tools.
Short descriptive statements of style can also help (like “granny on acid” or “rainbow cowboy in London” or on the more mainstream end, “coastal cottage” or “modern farmhouse”). These design tools start to give you a framework that helps you make decisions about what to include or not. It is the beginning of the creative process.
As you get better and develop your creativity, you will begin to create your own unique styles.
The Style of your Garden should Complement the Style of your Home
Knowing your style and the styles of your home, neighborhood, and region will help you define the boundaries for your ideas – it will give your landscape design project some structure. If you are an idea addict, it will help you create some rules for yourself! That way, you can vet the ideas against the structure and know which ones to keep.
And if you are creatively cramped, it will begin to reveal the creativity inside you.
There are many formulaic ways to jump-start your creative design juices when you are planning a garden’s design… (I can show you how inside my garden design classes… it really is so fun).
All the techniques of residential landscape design are useless without you adding in your unique style and creativity. Without fresh ideas, your design will quite simply be boring.
“The chief enemy of creativity is good sense.”
― Pablo Picasso
I use my own Style Story Framework to help me discover my own style and what makes each of my clients and students unique.
Before doing anything else in your garden – figure out what stories you want to tell – what your garden is all about, and how it is going to be a reflection of you.
Step #4 – Designing your own garden – Create a Master Plan
There are three main types of drawings and plans that garden designers make:
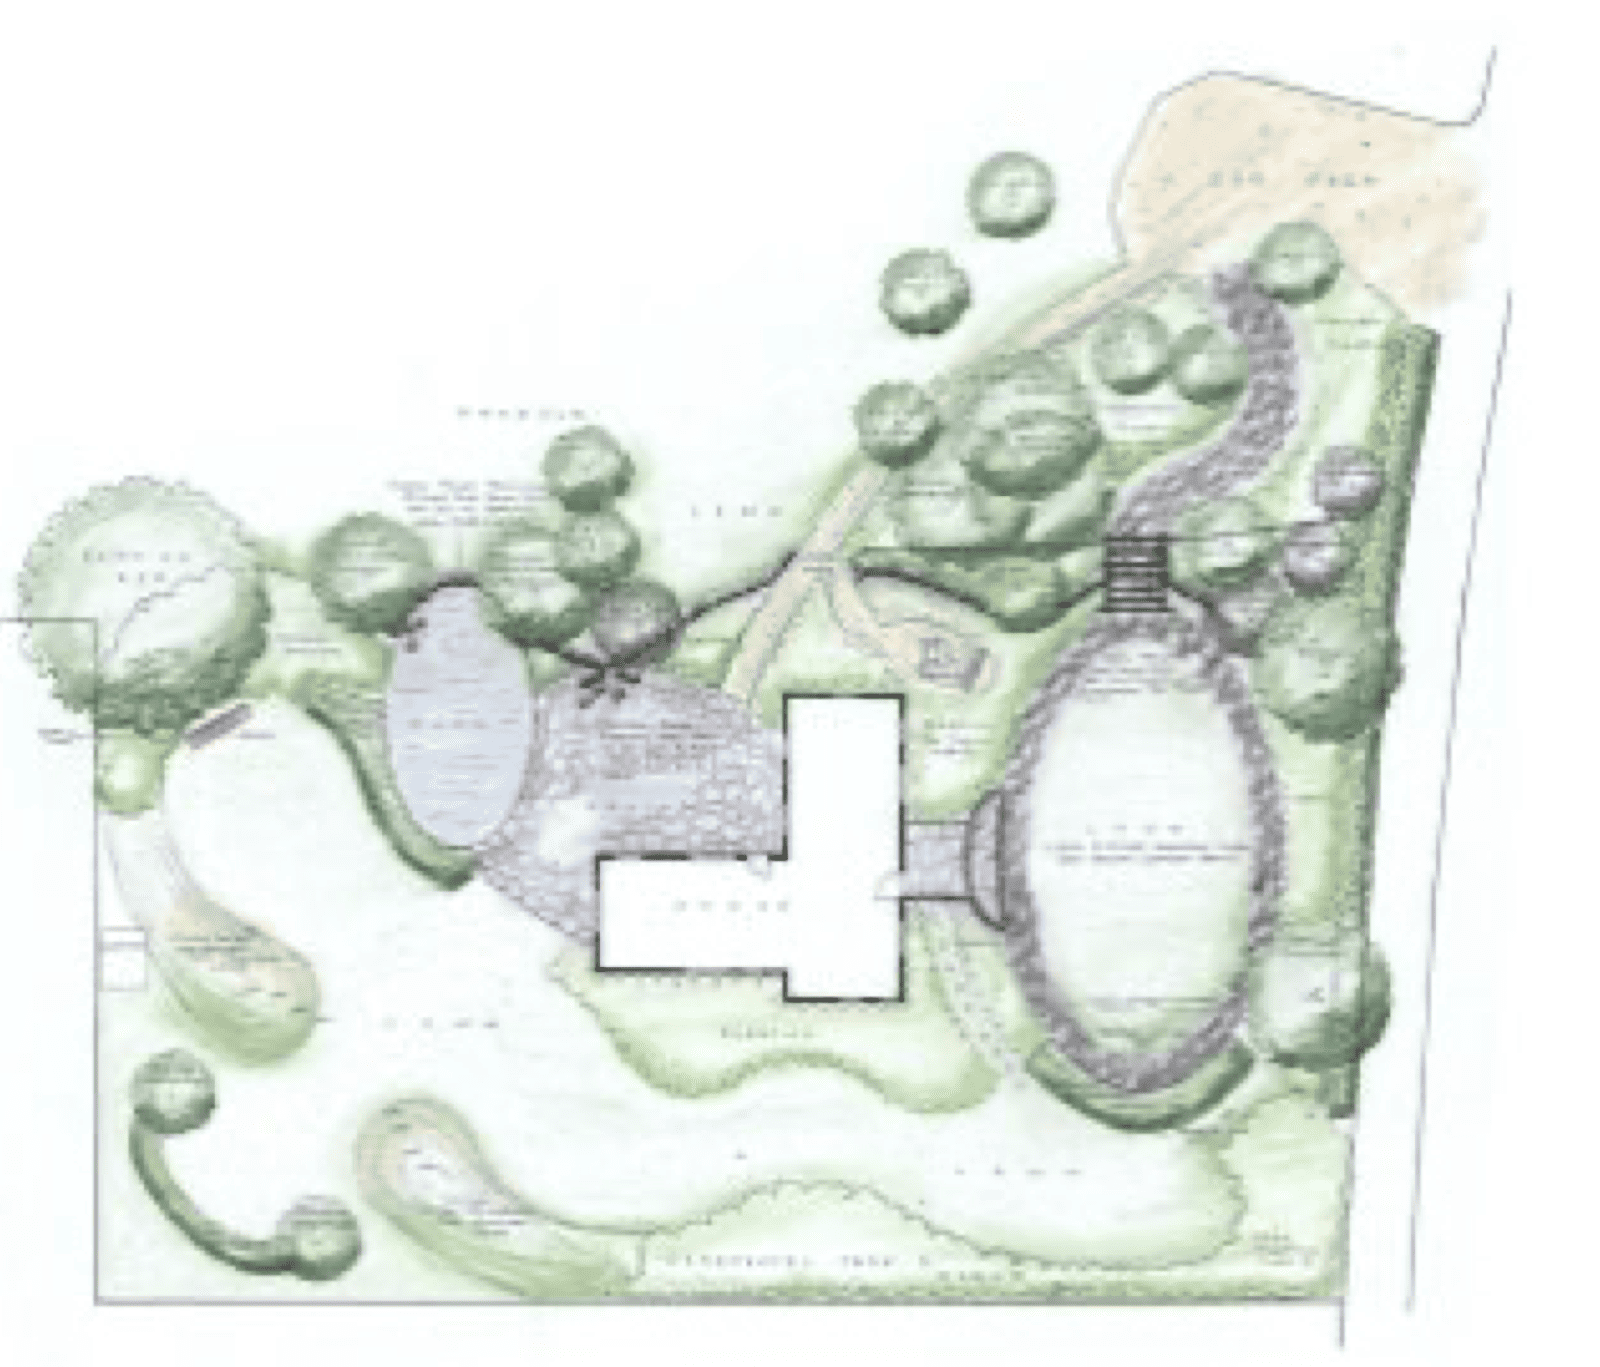
1) The Master Plan and other home garden drawing ideas
This is where we put together the structure of the garden, the placement of the hardscaping, the walls, and the main elements, and figure out how they relate to each other and how they all piece together.
If you think in architectural terms – it is the plan for the house. It organizes all the rooms, connects them, and puts them all together in a design that makes a complete building or a home.
But it doesn’t really go further than the building. As you finalize a master plan, you might start to pick out the finishes in the kitchen – but it definitely doesn’t sort out which couch and the color of the upholstery.
Creating a quick version of a master plan (often called bubble drawings) is how you test out ideas, examine the feasibility of an idea, and start to refine design ideas that you like and make them work and fit for you and your home garden.
Once the master plan is created, it becomes a planning tool and a way to communicate your ideas. And you will need to communicate your design – many people will be involved in the creation of your home garden – Family members, contractors, and anyone who will help you to create your landscape will use the plan to understand and help you bring your vision to life.
2) – Designing with Plants – Creating Planting plans.

Once you have the master plan you will know where it is that you want to have different planting areas. Then, you can go about making individual plans for each area.
In our house-building analogy – this is when you get to go couch shopping (or to the nursery!). Big gardens might have many planting plans for different areas of the garden.
We use planting plans to think through a design and help us research and vet our ideas – but we also use them to know how many things we need to buy and how they go together.
3) Specialized drawings.
Specialized garden design drawings, generally construction drawings (showing how to build something) or drawings for unique elements or renderings. These are not always needed but can be helpful in some cases. Here are a few examples:
When designing your own garden – Making a plan will save you money $$
You can use a plan to get an idea of the cost of your garden. Cost calculators allow you to measure areas of paving or materials, even beds, and use multipliers to get an idea of the expense.
By drawing a landscape plant to scale, you can quickly see if something is too small, too big, it doesn’t fit, or is ill-proportioned, or if it is in the wrong place.
Remember, it’s cheap and easy to explore ideas on paper – it’s hard to and expensive to explore them on the ground.
The G.P.S Planmaker (my personal system for generating lots of home garden design ideas)
In The Garden Design Lab I teach my own system – I call it the G.P.S. Plan Maker for generating lots of master plan options for any garden. Exploring ideas in a systematic way will show you options for your garden that you would otherwise never have imagined.
The ’S’ in my G.P.S. Plan Maker System stands for Shape – Give everything a meaningful shape and make all the shapes fit together. Let me show you how it works in a simple example…
Imagine your house and landscape – probably something shapeless and kinda like this.
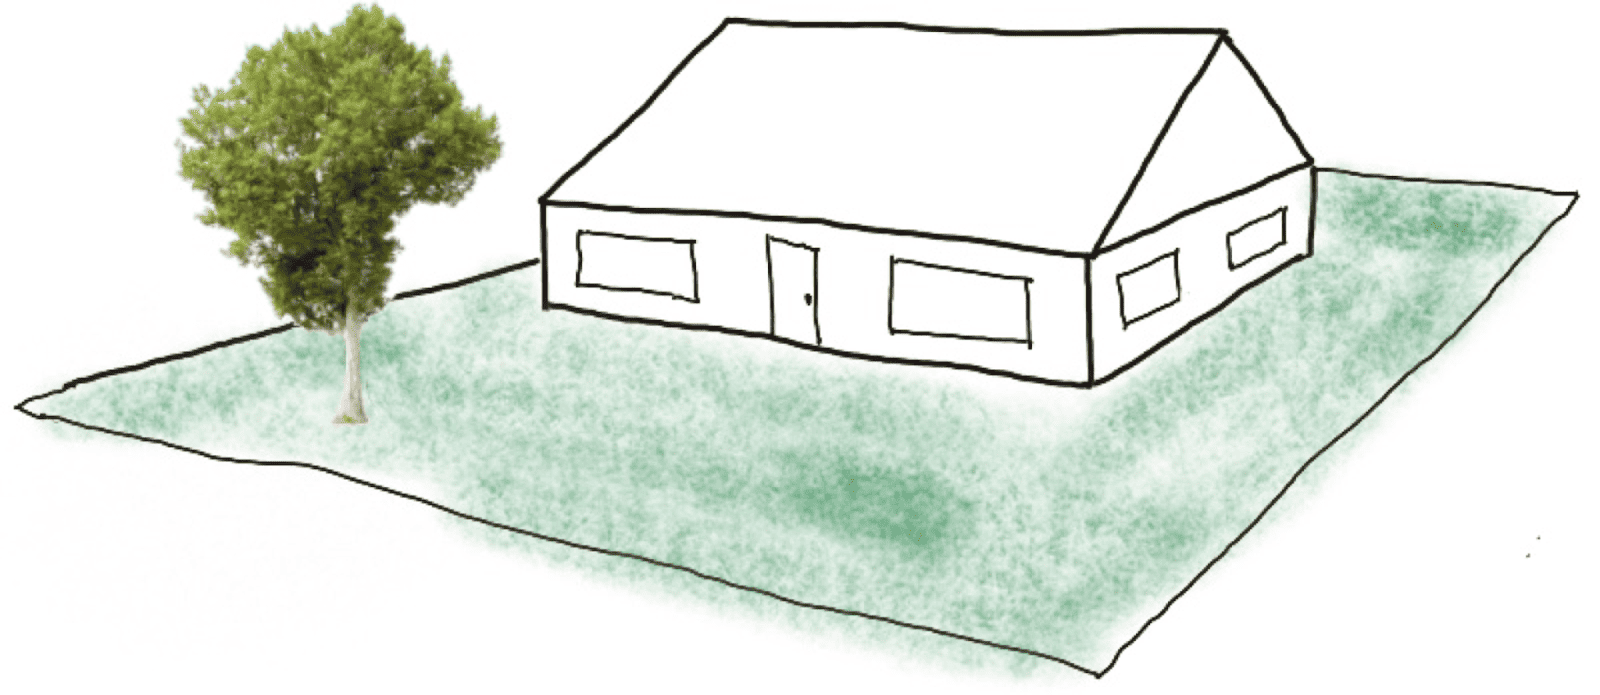
How to design a better garden layout in one easy step – draw a shape.
What happens if you add just one shape – a circle or an oval (or TBH, this could be a square or a rectangle) and you start to build off of it?
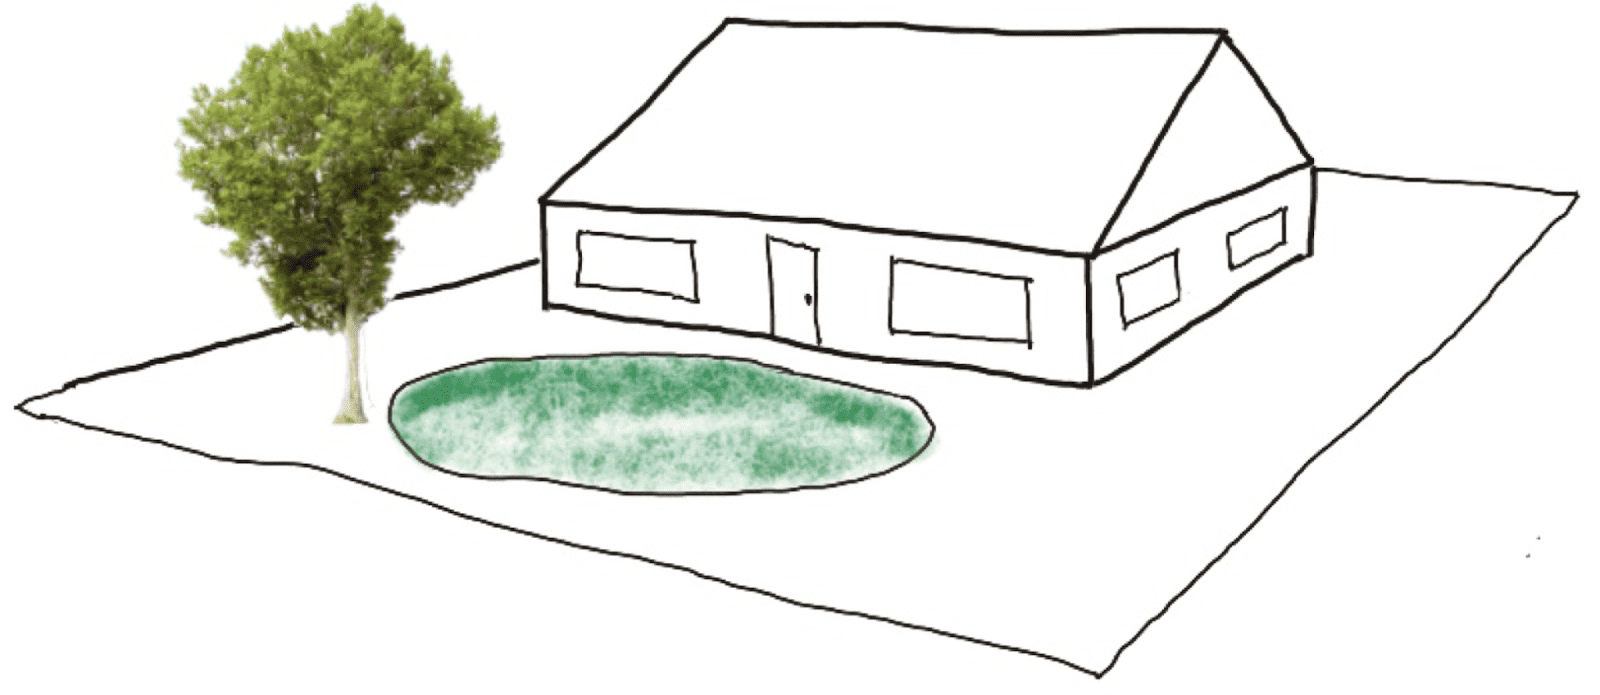
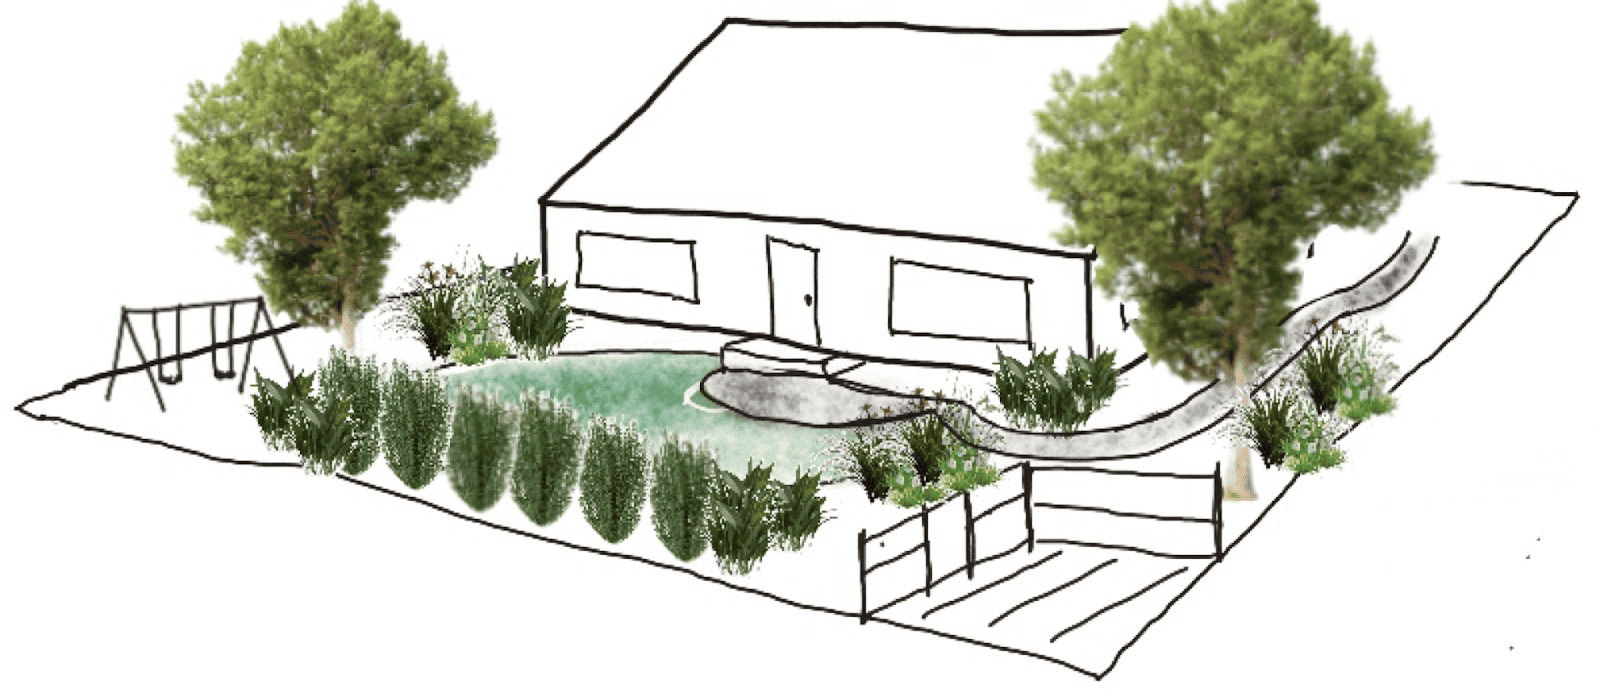
Instead of having wall-to-wall carpeting (which, BTW, is not good for the environment!) with all the plants pushed to the edges (in the dreaded and dull, skinny little border plantings and foundation beds), you work from the center of the garden out. (Rather than the outside in).
Suddenly, you have spaces that are scaled better, that are cozy and comfortable, and that are surrounded by plants. Plus, there is space for other usable areas that make a garden functional, interesting, and exciting.
Step #5 Add Details to the Design
Details matter, and they give a place a unique personality.
Color, materials, art, and finishes — These choices can make one garden wildly different from another. Think of the selection of the material as its own palette. It should be part of the overall story, and it should have its own set of rules.
Check out this post, where I show you how one plan can look entirely different (in 6 different ways) just by choosing different materials. It is amazing and inspiring. Hopefully, it will show you how simple it is with a little planning to add personality and great design to your own garden.
Also – when it comes to how to design your garden – and specifically how to add details to the design – this post. –From Nice to Wow: Garden design Ideas to make Any Landscape Better is also great.
Step # 6 Explore Planting Options and Create a Planting Plan for Each planting Area.
Ahh – we have finally arrived at the planting plan stage!!!
Just like with the materials (did you go read those posts?), styling the plants in different ways can make the same layout look entirely different.
The same garden can be styled with different plants, and it will look and feel wildly different.
I know imagining how to design a garden layout might feel like too much – too hard – but if you break it down into simple layers, you will find that every new layer of design gives you the option to infuse something new and exciting.
From the layout to the details and materials to the plants, home garden design is not hard (when taken one layer at a time). It really just a game of math – simple layers -with many permutations that can give you endless unique options.
The trick to planting plans is to choose from the millions of possible plants that you could plant, to find the ones that will happily grow in your garden, and then also create the ‘look’ you are trying to achieve. Like, so easy… I can tell you are sitting on the other side of your screen saying, ” I don’t know plants – or not enough… and you are right. You probably don’t. But there is a better way.
There are two sets of skills involved in planting design:
- An ability to create interesting vignettes that build on your overall design vision.
- While also using real live plants that will thrive and work where you live.
A garden without plants is not really a garden, but also a garden with dead or dying plants is even more uninspiring.
The only thing worse than a garden without plants (is that even a garden?) is a garden full of miserable plants.
Healthy, happy plants are beautiful.
You need to learn how to combine plants and the tricks of making them look good together. And also how to find the right plants – the ones that will work in your garden.
How to design your garden, my planting plan advice – Design by job
Have your parameters firmly in mind – like a job description for an employee – then look for plants that fit the requirements.
For example, I need a native plant that adds purple to the late summer planting mix. (either with flower or foliage) that stands at least 18 inches tall. It needs to tolerate dry fast draining soil and survive the winters in Boston.
By taking a few minutes to think through what you need to achieve your vision, three things will happen. 1) you will be more focused and less inclined towards impulse buys at the garden center. 2) Your plant choices will radically improve and 3) you will be able to quickly learn new useful plants and ask better questions.
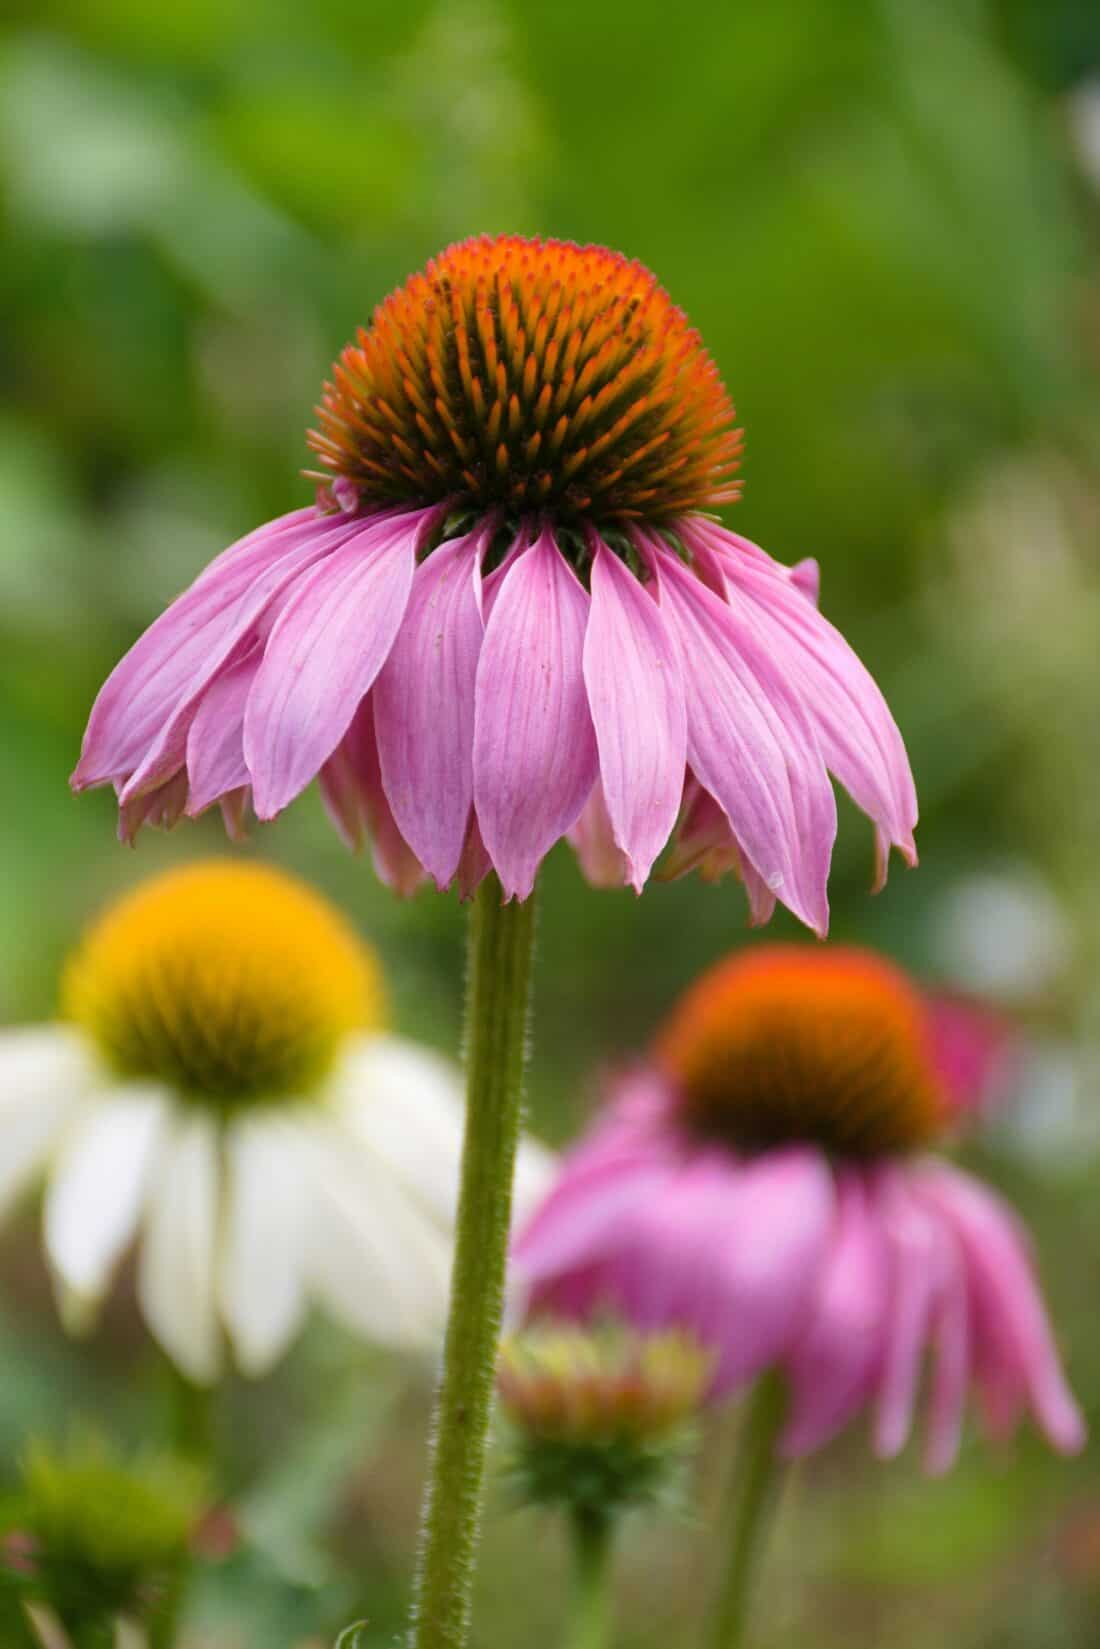
The plant I described above could be a purple coneflower – but it could also be ‘Baby Joe’ Dwarf Joe Pye Weed (if the cone flower is unavailable).
In fact, if I just enter “purple native plant zone 5 full sun” into Google, it starts to narrow down my list of plants for me, and it reminds me of plant options I can use in the garden design that I might have forgotten or overlooked.
Now, Google isn’t perfect – this search gave me Liatris and Asters (both of which are great options and fit my job description), but it also gave me Butterfly Bush and Lavender (neither are native – so be aware – you will have to check the google answers).
The bottom line is this – you need to stop shopping for plants and then trying to find a place to put them (I talk about the horrors of being a Plop and Drop Gardener here)- instead, work from a job description and then find the right candidates that will succeed and thrive in their new position.
And just to repeat – Don’t start with this step. Do all the other steps first!
Building and Installing the Garden
Now that you have a plan and know how to design your garden – how do you go about building it?
As a new gardener – my best advice is to not try to do too many things all at once.
Take a staged approach.
Gardens need people – they are, by definition – cultivated and not wild. Cultivation is an act that humans do. A verb – and if you don’t do it – then the garden will stop being the garden – and it will go back to being wild.
You can certainly design for more or less input required (maintenance) from the cultivator (that is you), but what you don’t want to do is accidentally take on too much too fast. You will cause yourself overwhelm and disappointment and ultimately discouragement that makes many budding gardeners give up.
I don’t want that for you – so go slow – take your time.
Home garden design isn’t a race – and there is no finish line. Give yourself a break and work on it as you can. Enjoy the process, enjoy your wins, and just keep going.
This is the only way to make sure your garden is a long-term proposition.
Take a staged approach to building your garden. As your skills improve, you will get better at managing it.
Baby Plants are like Baby Humans
Also, baby plants are like baby humans – they require lots of extra attention – so if you have 27 tuplets (or whatever the number of new baby plants you might have just planted), you are going to be much crazed than if you have a single newborn. Keep this in mind.
Plants become much less intensive once they are established… and establishing can take as much a few years. Space things out for your own sanity and pocketbook health.
If you have a garden design plan, you have a plan for taking it at any pace. With a plan, it is easier to carve out pieces over time and still be working towards a big, cohesive, beautiful idea.
How to design your own garden – one last tip for you:
It is easy to get overwhelmed – even with a plan in hand. So, where do you start with installation? I’ll always advise working on the areas closest to your house first. But if there is an access issue – you may need to think about starting where access is worst.
(Like if you are going to destroy some part of your garden to get access to another part of your garden – you may need to work on that first).
Another thing to prioritize is fixing soil and drainage problems. These things become much more difficult and expensive to solve later, and they aren’t going to get better on their own. You can’t exactly improve the soil very easily after you have installed the plants. Always improve the soil (if you need to) before you install plants, and then keep building it in healthy ways as you build your garden.
And the last step … Enjoy spending time outside!
>>> Want to learn more about how to design your own garden? – Join one of my online garden design courses.
+comments+